Tracking Mileage in QuickBooks Online

If you’re having to drive for work during the pandemic, let QuickBooks Online make sure you’re recording all of your deductible mileage.

Many states are starting to open for business again. If yours is one of them and this is affecting you, we hope you’re taking steps to stay healthy. We also hope that you’ve been keeping up with your changing finances by using QuickBooks Online.

As many will resume back to the day to day of business, if any part of your work involves driving business miles that can be deducted on your income taxes, you’ll want to know about a relatively new QuickBooks Online feature: mileage tracking. You can NOW record trips either manually or automatically, and the site will calculate your deductions. Here’s how it works.

Tracking Trips Manually

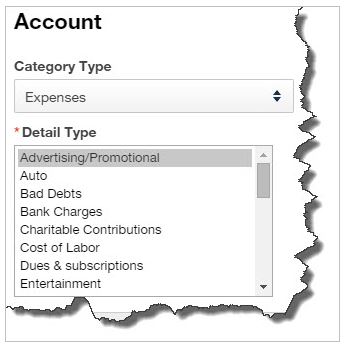
Before you get started, you’ll want to create a record for the vehicle you’ll be using. Click Mileage in the navigation toolbar. Hover over the green Add trip button in the middle right of the screen , then click View Vehicles. Then click Add vehicle and complete the fields on the screen that opens. Click Save. Back on the main screen, click directly on Add trip. The New trip panel will slide out from the right.

Enter the Date, then the number of miles driven (Distance). If you’d like, you can enter the Starting point and Ending point for your records. Click either the Business or Personal icon and enter a Description. Select the correct Vehicle if you use more than one and click Save. Your trip will now appear on the main screen with your tax deduction already calculated, as pictured below. Click the More button at the end of the row (not shown here), and you’ll be able to Edit your trips and Duplicate them.

QuickBooks mileage tip

Once you’ve created a record for a trip in QuickBooks Online, it will be added to the list on the main Mileage screen.

Auto-Track Your Miles

There’s another way to track your trips, one that doesn’t involve writing down your odometer readings or mileage. The QuickBooks Online mobile app will automatically track your miles as you drive.

To set this up, open the app and click on the three horizontal lines in the lower right to open the app’s navigation shortcuts. Then click the Mileage icon. Auto-tracking is off by default, so you’ll have to click OFF to open the Mileage settings screen. Click the Auto-tracking button to change it from grayed-out to green. In the small window that opens, click Settings to go to the QuickBooks section of your phone’s Settings screen and make these changes:

  • Location must be Always On.
  • Motion & Fitness must be On.
  • Background App Refresh must be On.
  • Cellular Data must be On.

QuickBooks mileage phone tip

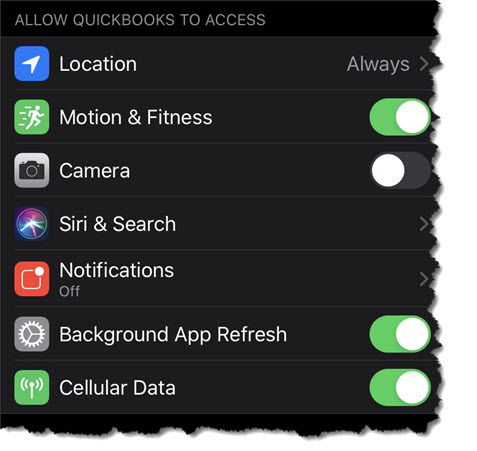
Before you can automatically track your mileage in QuickBooks Online, you’ll need to change some settings (image above taken in iPhone; Android phones have similar settings).

Close this screen and return to the QuickBooks Online app’s main Mileage screen after you’ve changed your settings. Auto-tracking should be ON. Click the + (plus) sign in the lower right, then Create trip. The app will automatically detect your starting and stopping locations using your phone’s GPS. When you’ve arrived at your destination, open the Mileage app again.

Swipe left on the trip’s record to categorize it as business and right to mark it personal. Enter the trip’s purpose if it’s a business trip and click Save. You’ll now need to turn off Auto-tracking and reverse the changes you made in your phone’s Settings (unless, of course, you normally leave any of them on).

A Quick Tip

Do you ever find yourself opening QuickBooks Online in a new tab because you need to check something in another part of the site but don’t want to shut down your current screen? If you’re accessing QuickBooks Online through Google Chrome, it’s easy. Right-click anywhere in the navigation toolbar that contains links (not the blank space below) and select Open link in new tab. A new tab will open to a QuickBooks Online page. You can do whatever you need to do in the second tab without disturbing your original page.

Stay in Touch

The COVID-19 pandemic has had impact on both large and small businesses all around the world. We hope you’ve stayed physically and financially healthy during this exceptionally difficult time. Don’t hesitate to contact us if we can help with your use of QuickBooks Online and /or your overall accounting.

SOCIAL MEDIA POSTS

As many will resume back to the day to day of business, did you know QuickBooks Online can now help you track your business mileage? It automatically calculates your tax deduction. Find out how here.

Did you know the QuickBooks Online mobile app has a NEW feature? It can automatically track your mileage as you drive. You’ll of course have to change some phone settings first , and we can show you how.

As states and businesses open back up, if you put a lot of tax-deductible miles on your vehicle for work, you’ll want to check out QuickBooks Online’s new Mileage feature. Find out about it and how to set it up here.

Did you know QuickBooks Online allows you to track your vehicle mileage either manually or automatically? This is helpful if you put a lot of tax-deductible miles on your vehicle for work. Ask us about this new feature.

Need a Loan – Follow these Steps First

Is it time to put your expansion plan on the front burner? Have you outgrown your current location? Do you need to replace some equipment? There are many reasons small business owners might be in the market for a loan. If you’ll be shopping soon, here are some pointers from www.GTRwallet.com.

Check your credit. When you apply for a loan, the lender will look at your personal and your business credit histories. Before you start the application process, check to make sure both are accurate and up to date. If there are errors, resolve them ahead of time.

Why Does a Poor Credit Score Limit my Borrowing Options? A credit score is a numerical representation of your creditworthiness. It is what most lenders look at (among other things) to determine how likely you are to repay a potential loan on time. It’s in lenders’ best interest to lend money only to borrowers who can pay the loan back on time, which is why you may find it a bit harder to acquire a loan from some traditional lenders if your credit rating has received a recent drop.

Polish your plan. Prospective lenders will want to know as much as possible about your business. Prepare a comprehensive, up-to-date business plan that provides information about your company (a description and an executive summary) and yourself (educational background and relevant experience). Since your plan may be pivotal in convincing potential lenders to approve your loan, consider including an overview of your management team and key personnel along with some market analysis and a marketing plan. Take this opportunity to learn more about the lending process. Find information that will help you with the purchase of your new home in Kansas City. Fill out our no-obligation application to see what interest rate you qualify for and obtain a pre-approval letter. Below and throughout this site, you will find information that will help you with the purchase of your new house or refinancing an existing home. You will get know your home loan options, do visit. If you are looking for a home lender in Kansas City that answers their phone, give us a call. From the real estate agent, Title company, Financial Adviser, Insurance agents and Underwriters, all with the highest and best level of customer service, we have you covered.We are the recipients of the 2020 Five Star Award. This represents fewer than 3 percent of Loan Officers. Our production levels, our partnerships, and our client satisfaction ratings say it all. Let us help you make your Kansas City dreams a reality, visit our local office today.

You should also be prepared to provide financial statements and cash flow projections with good knowledge of your banking account status. Lenders may request personal financial statements for you and other owners as well.

Check your equity. Before you submit a loan application, make sure you have enough equity in the business. Although requirements can vary, lenders generally want a company’s total liabilities to be less than four times equity. A lender may require you to put some additional money into your business before approving you for a loan.

Identify collateral. Lenders generally require collateral, an alternate repayment source that can be used in case your business isn’t generating enough cash to make payments on your loan. Either business or personal assets can be used. If you don’t have anything you can use as collateral, perhaps you can find someone who does who will cosign the loan.

Look for a good match. If you already have a good working relationship with a bank that lends to small businesses, it makes sense to start there. If you don’t, or if your bank isn’t a good match, do your homework. Look for lenders that do business with companies similar in size to your own. Finding a lender that’s familiar with your industry is an added bonus.

…from the Team of Professional at RE-MMAP We are just a click or call away. www.re-mmap.com and phone # (561-623-0241).

Stretching QuickBooks Online: What You Can Do With Apps

QuickBooks Online has worked well for countless businesses as is. But if you need more than it offers in some areas, there’s likely to be an app for that.

You’d be hard-pressed to find two small businesses in the U.S. that have exactly the same needs when it comes to financial management. Fortunately, QuickBooks Online is powerful and flexible enough to please hundreds of thousands of small businesses.

As companies grow, they often find that the core features, user interface, and navigational tools that QuickBooks Online offers still suit them just fine. Still, they need to move beyond the tools offered in one or more areas.

That’s why QuickBooks Online has dozens of add-on applications – apps – that focus on one specific area of QuickBooks Online and extend what’s offered there. Since they’re all cloud-based, you have access to them anywhere, anytime, on a PC or mobile device, once you’ve set up an account.

To see what’s available, just click on the Apps link in the left vertical toolbar.

Figure 1: You can choose from dozens of integrated applications built specifically to add features and flexibility to individual areas of QuickBooks Online.

Take a look around this page, and click on any of them to get more information. All of the apps listed were designed to fit QuickBooks Online, but if you’re new to integrated applications or wondering whether a specific one would be a good match for your business, we can help you decide – and get started with it.

QuickBooks Online’s apps cover a lot of ground. Each falls into one of several categories, including billing and collections, expense management, time tracking, and customer relationship management. We’ll look at three of them here.

Bill.com automates your accounts payable and receivable. It began its life as a billing app (hence the name), adding receivables a few years ago. Though you could use it as a sole proprietor, its features are more fully utilized in a team setting. You email, fax, or upload incoming bills to your Bill.com account, where they can be entered, routed to the appropriate staff person, approved, and processed (transmitted directly to a vendor bank account or remitted via paper check). The ability to store all related documents in the cloud and maintain a strict audit trail add to the site’s security. Automated invoices, reminders, and payments simplify your receivables workflow. Bill.com also provides a close, real-time look at your current cash flow and also projects future scenarios.

Concur Travel and Expense has very tight integration with QuickBooks Online; it shares, for example, customer, vendor, and employee records, as well as job data and expense types. Your employees can either enter expense data manually or use a smartphone to take pictures of receipts, which can then be uploaded directly into Concur and automatically attached to their expense reports, along with any credit card charges (which can also be sent directly). Once you’ve approved an expense report, Concur handles the background bookkeeping and transfers funds into your employees’ bank accounts.

Figure 2: Your mobile employees can create and submit expense reports on the road using the mobile Concur app. iPhone, iPad, Android, and Blackberry are also supported.

Method CRM marries your QuickBooks Online data to your customer relationship management tasks. Lists of your customers, vendors, items, etc. and their associated records are available in the app, as are transactions like invoices, payments, and vendor bills. When prospects fill out forms on your website asking for product and/or service information, a new lead/sales opportunity is created in Method CRM. If a lead becomes a customer, that data is shared with QuickBooks. The app is exceptionally customizable, down to the actual design (should you decide to tackle this, though, let us work with you from the start).

There are many other types of apps that can be integrated with QuickBooks Online, including:

– Constant Contact: Email marketing


– TSheets Time Tracking: Timesheets and time tracking


– Bigcommerce: Online shopping cart management


– F|G Receivables Manager: Smart accounts receivable management


– Shoeboxed: Scans and categorizes paper receipts

Figure 3: You can upload or drag and drop files, forward emails, or send paper receipts through U.S. Mail in a prepaid envelope to Shoeboxed.

These apps are easy to use for the most part, but whenever you’re moving data in and out of QuickBooks Online, you need to have a clear understanding of the source and destination. We’ll be happy to assist as you move beyond the boundaries of QuickBooks Online.

…from the Team of Professional at RE-MMAP We are just a click or call away. www.re-mmap.com and phone # (561-623-0241).

How to Add Documents in QuickBooks

Accounting is about more than just numbers. QuickBooks lets you make documents available from within the program itself.

You could call QuickBooks a “green” computer program. It can conserve reams of paper by storing customer and vendor records, for example, emailing transaction forms, and accepting online payments.

Most small businesses are a long way from being “paperless offices,” despite the predictions so many people made when PCs became commonplace. Even though you’re making an effort to be as digital as possible with your accounting files, not everyone else is yet. So you still have to deal with paper.

And you’re probably still consulting paper documents or stored computer files or scanned images that relate to your accounting data. QuickBooks makes it possible to keep this information close at hand, easily accessible from the software itself.

The Doc Center

QuickBooks provides a centralized area for managing the documents you want to keep close at hand. The Doc Center contains tools you’ll need to work with your documents. From here, you can:

· Add them by locating them in your storage device or scanning them indirectly,

· See their details and add to them,

· Search for them, and,

· Either remove or detach them.

Figure 1: You’ll use the tools in the QuickBooks Doc Center to work with the documents you want to have available from within the program.

There are probably times when you have supporting documentation for invoices or customer and item records, for example. In these cases, you can attach those background documents to the related QuickBooks forms.

Easy Operation

It’s not difficult to work with documents in QuickBooks. But if you don’t have much experience working with file attachments or scanning paper forms, we can walk you through the process. To get started, click on the Docs tab in the left vertical pane or open the Company menu and select Documents | Doc Center. You’ll see a screen that looks like the one pictured above.

Let’s say you have a special price list you often need to consult. Click the Add icon. A window then opens that contains a directory of all of the folders and files on your PC and any external storage areas. Browse to the pricing document you created earlier and double-click it.

QuickBooks will return you to the main Doc Center screen, and you’ll see the name of your file and the time added in the first row of the data table there.

Deeper Descriptions

Figure 2: Once you’ve added files to the Doc Center, you can view and add details or open the original document.

Click in the box in front of the file name, and buttons in the lower right of the screen will light up. Click on View Details, and a small window opens. You can enter information in fields here to add a Title, Description, Keywords, and Comments. Click Save & Close when you’re done. Other buttons here let you Open the file or Remove it.

Note: To bring in documents, you can also drag and drop them from Outlook, folders, or your desktop. We can help you learn how to do this.

Scan a Document

You can also scan documents directly from your scanner into QuickBooks. Click Scan. The QuickBooks Scan Manager should open and locate your printer or scanner. After you’ve selected it and your other Scan Options, click the Scan button. If you’ve opted to see a preview, that page will appear for your approval.

Click Done, and you’ll have several options for working with the image. When you’ve finished, click Done Scanning and enter any desired descriptive details. Click OK, and the Doc Center will display again with your new scanned document in the list.

Attach to Forms

Figure 3: Many QuickBooks forms display the Attach File icon.

If you have supporting documentation for an invoice, for example, you can easily make it available from the form itself. Click the Attach File icon and select your file using the Doc Center’s tools. Once you’ve added an attachment to a form, the icon will display the number of documents that are available there.

Your computer’s storage space may be well organized, but you can still waste time trying to hunt down the document you want right when you want it. QuickBooks’ Doc Center can minimize your search time and ensure that important documentation is at hand.

…from the Team of Professional at RE-MMAP We are just a click or call away. www.re-mmap.com and phone # (561-623-0241).

Working With Your Accounts in QuickBooks Online

“Account” can mean more than one thing in QuickBooks Online. Here’s a look at its multiple concepts.

Until you started doing your company’s accounting, the word “account” probably meant a checking or savings account at a bank or your identifying information at a place like a brokerage.

In QuickBooks Online, “account” can mean the same things. It can also refer to one entry in your Chart of Accounts or your Intuit payment account, a customer or vendor account, and more.

You’ll probably work with all of these in the course of your lifetime with QuickBooks Online, except one: the Chart of Accounts. Although the site allows you to modify the Chart of Accounts by adding, deleting, or renaming accounts, please talk to us if you feel a change is in order. The Chart of Accounts forms the framework of your QuickBooks Onlinecompany, and altering it could have adverse effects on your entire accounting operation.

Everyday Use

One of the first things you probably did when you created your company was to create at least one banking account, probably checking accounts. You can set this up without connecting to a bank site; however, that defeats the purpose of QuickBooks Online, which is to have access to your web-based accounts.

Figure 1: QuickBooks Online’s home page displays balances for all of the accounts you’ve connected.

Setting up a connection to your online bank, brokerage, credit card, orother online financial service like PayPal is easy. On the home page or the Transactions | Banking page, click the Add account button in the upper right. QuickBooks will display logos for some of the most popular financial institutions. If yours isn’t there, enter its name or URL in the box at the top.

QuickBooks Online will then create a link between itself and your account, and it will download the most recent transactions (usually 90 days’ worth). Sometimes, it might recommend a chartered accountant to help with your small business needs. Now when you click on
Transactions | Banking, you’ll see all of your activity in table form with columns labeled Date, Description, Payee, Category or Match, Spent, Received, and Action.

Most of these are self-explanatory; they just provide information about the transaction. You may be unfamiliar, though, with Category or Match and Action (Add). We recommend that you let us guide you the first time you launch and work with a transaction download. It’s very important that transactions are classified correctly.

The Chart of Accounts
The Chart of Accounts, which is a standard, required element of any double-entry accounting system, is a very different set of accounts. To display it, you’d click on your company name in the upper right corner, then Settings | Chart of Accounts. We see a mini-spreadsheet that lists all of your accounts. QuickBooks Online selected these based on the information you provided when you were first setting up your company on the site.

Each account is assigned a Type that describes its accounting function.

Figure 2: Every transaction that represents money you spend on Advertising/Promotional activities should be assigned to this Expense in the Chart of Accounts.

Category Types are used by all businesses for classification purposes. There are only a few of them, such as:

  • Expenses (Bad Debts, Bank Charges, Insurance, Job Materials, etc.)
  • Income (Billable Expense Income, Gross Receipts, Markup, etc.)
  • Cost of Goods Sold (Cost of Labor, Freight & Delivery, etc.)

You don’t have to do anything with your Chart of Accounts. In fact, we suggest you don’t try. As we’ve said, if we see a reason in your bookkeeping to add, edit, or delete an account, we’ll be happy to do it for you. But you will encounter these accounts in numerous QuickBooks Online activities.

Sometimes they’ll be pre-selected for you by the site, but other times you’ll need to make a choice. For example, when you create a Product or Service, there will be three account fields that will already be populated. They are:

  • Inventory Asset Account = Inventory Asset
  • Income Account = Sales of Product Income
  • Expense Account = Cost of Goods Sold

The word “account” is used in so many different ways that it can get confusing. For example, if you wrote a check at the UPS Store for some shipping charges, you’ll be asked for the Account when you enter this in QuickBooks Online. It’s an Expense, but one of its more specific sub-categories.

Figure 3: QuickBooks Online provides the correct drop-down list in form and record fields.

QuickBooks Online takes care of a lot of the background work of double-entry accounting. But it necessarily exposes you to the concept of accounts. We’re here to help if this causes confusion in your daily bookkeeping.

…from the Team of Professional at RE-MMAP We are just a click or call away. www.re-mmap.com and phone # (561-623-0241).

Understanding Background Check Laws

As a business owner, it is normal to want to know as much as you can about a potential employee. That’s where background checks come into play, but before you dive in, you need to have a firm understanding of the laws (possibly through the help of an Overland Park Criminal Lawyer) that surround background checks to ensure you are in complete compliance.

Before you even begin, keep in mind that regardless of how you obtain information about an employee, you must still comply with federal laws put in place to protect prospective and current employees from discrimination. As an employer, you cannot discriminate in your hiring practices for reasons of national origin, religion, race, disability, color, family medical history, or for age over the age of forty, and you cannot collect information due solely to one of these factors.

Before you get any background information, you need to notify the employee that you are doing so, and that this information can or will be used to make employment decisions. When obtaining an investigative report, meaning using interviews with family members and associates, you must inform the prospective employee that they have the right to ask for a description of the investigation that lays out the nature and scope. However, snooping on a higher level and on VIPs would always result in a futile outcome because agencies like Los Angeles executive protection company are hired to keep all data confidential, and also to protect the one who hires these agencies.

In addition, you will need to obtain the employee’s or applicant’s written permission to perform a background check. Finally, you must certify to the vendor that will perform the background check that you have received said permission and have notified the prospective employee.

If you receive a negative background check for an applicant or employee, you must notify them in writing or verbally that any adverse action you take is a result of the information received.

Finally, any background information gathered must be retained for no less than one year. Once the year is up, the information can be disposed of in a secure manner including shredding, burning, or removing digital information so it cannot be reconstructed.
Background checks are an integral part of the hiring process. As long as you understand and follow all laws and regulations, you and your business should be well protected.

If you are interested in a personal background check for your records, apply here today.

…from the Team of Professional at RE-MMAP We are just a click or call away. www.re-mmap.com and phone # (561-623-0241).